
 Once our new students learned how to make the drawstring bag as their first project, we encouraged them to make a 4-patch pillow for their second sewing project. With this project they reviewed the parts of the machine again, and sewing straight stitch along the pressure foot edge. They were also able to review back-tack, pivoting, and cutting the threads at the proper length. New things they learned with this project was; pressing seams, matching seams, where to leave an opening for a pillow, sewing a project pretty sides together so that when it turns around there are no raw edges, hand sewing a button on, poking out corners, stuffing the pillow, and how to hand sew an opening closed. So that the new student could get used to following sewing directions, we had them read each step, look at the photo, and try to figure it out themselves first before we helped.
Here are the basic directions for the project that we had our new students do as a 2nd sewing project for a beginner. You are welcome to print this out and use it over and over again for all your new students.
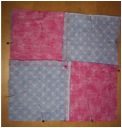
 1. Cut eight 5″ squares of fabric. Place 4 squares on a table the way you want them to look on your pillow.
 2.Place one square of each color PRETTY SIDES TOGETHER as shown in the picture. Pin ONE SIDE of the square (as shown in the picture) and stitch down the one side using the pressure foot as your guide. (or 3/8”). This is the stitch you will use for this project. Do the same to the other 2 squares.
 3. This is what you should have. (two 2 squares) Press the seams together towards the darker fabric.
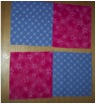
 4. Place the two sets of 2 squares PRETTY SIDES together matching at the seam as shown in photo 4. (Make sure opposite colors are pretty sides together as shown in the photo.)
 5.Pin and stitch down one long side.
 6.The front your pillow is done. Hand stitch the button on in the center of the front of your pillow. Do the same for the other four squares to make a pillow back.
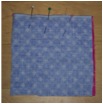
 7.Pin your pillow front to the pillow back with PRETTY SIDES TOGETHER. Leave an opening in your pillow as indicated on the back pillow piece. Stitch around your pillow. Pivot at the corners and remember not to sew at the opening.
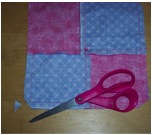 8. Clip the four corners of your pillow. Be careful not to cut into your stitching. Turn your pillow to pretty side out.
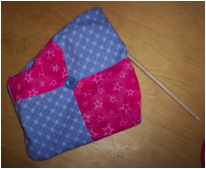 9. Gently poke out the corners with a pencil or stick. (This gives a more professional look to your pillow.)
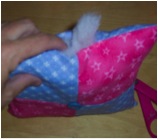
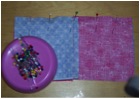
10. Stuff your pillow. Start with the corners and then stuff the middle.
 11. Hand stitch the opening closed.
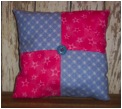
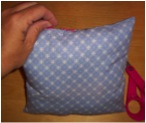
12. Your Awesome Foursquare Pillow is done!!!
One Response
Jenny
Can you show me what your “New Students’ First Project & First Lesson” is?